
Introduction
Are you tired of spending hours at the salon, waiting for your turn and then shelling out a hefty amount for a manicure? Well, fret no more! With the latest trend of jewelry-themed press-on nails, you can now enhance your nails with the glamour and elegance of jewelry without even leaving your home. These unique designs are perfect for beauty enthusiasts and nail art lovers who want to showcase their rockstar style. In this blog post, we will guide you through the process of applying and styling these fabulous press-on nails. So, let's dive in and discover how you can achieve salon-quality nails in just a few simple steps!
Press-on nails have become increasingly popular among individuals who love experimenting with different nail designs but don't have the time or patience to sit through a traditional manicure. These jewelry-themed press-on nails offer a hassle-free alternative that allows you to change up your look whenever you want, without any commitment. Whether you're attending a special event or simply want to add some pizzazz to your everyday style, these press-on nails are the perfect solution.
The target audience for this blog post includes beauty enthusiasts who are passionate about trying new nail trends and staying updated with the latest fashion statements. Nail art lovers who enjoy expressing their creativity through unique designs will also find this blog post informative and inspiring. Whether you're a beginner or an experienced nail artist, our step-by-step guide will help you achieve flawless results every time.
Nowadays, it's all about convenience and efficiency. With our busy schedules, finding time to visit a salon can be challenging. That's where jewelry-themed press-on nails come to the rescue! You can now enjoy a salon-quality manicure experience from the comfort of your own home. No more waiting in long queues or worrying about smudging your freshly painted nails while driving back home. With these press-on nails, all you need is a few minutes and a steady hand to achieve stunning results.
In the upcoming sections of this blog post, we will provide you with valuable tips for choosing the right size and shape of press-on nails that will perfectly fit your natural nails. We'll also explore creative ways to accessorize these jewelry-themed press-on nails, allowing you to express your individual style and make a bold fashion statement. Whether you prefer a subtle and elegant look or want to go all out with a dazzling design, we've got you covered.
So, if you're ready to elevate your nail game and unleash your inner diva, keep reading! Our comprehensive guide will walk you through the entire process of applying and styling jewelry-themed press-on nails. Get ready to turn heads and receive compliments on your fabulous manicure wherever you go. Let's get started on this exciting journey towards achieving salon-quality nails at home!
Creative Ways to Accessorize with Jewelry-Themed Press-On Nails
Jewelry-themed press-on nails are a great way to enhance your overall look and add a touch of glamour to your style. These unique designs allow you to showcase your individuality and make a statement wherever you go. Besides simply wearing them on their own, there are several creative ways you can accessorize with jewelry-themed press-on nails.
-
Match with Your Favorite Jewelry One of the easiest ways to accessorize with jewelry-themed press-on nails is to match them with your favorite pieces of jewelry. Whether it's a stunning pair of earrings, a dainty necklace, or a stack of bracelets, coordinating the colors and designs on your nails with your accessories can create a cohesive and put-together look. For example, if you're wearing gold press-on nails with intricate gemstone accents, consider pairing them with gold hoop earrings or a delicate gold pendant necklace for an elegant and coordinated ensemble.
-
Create a Statement Look If you're feeling bold and want to make a statement, don't be afraid to mix and match different jewelry-themed press-on nail designs. Experiment with combining various patterns, colors, and textures to create an eye-catching and unique look that reflects your personal style. You can create an ombre effect by using press-on nails in different shades of the same color family or even mix metallic accents with vibrant jewel tones for a striking contrast. The key is to have fun and let your creativity shine through.
Accessorizing with jewelry-themed press-on nails opens up endless possibilities for expressing yourself through nail art. Whether you choose to match them with your favorite jewelry pieces or create a bold statement look by mixing different designs, these press-on nails are sure to elevate your style game. So go ahead, embrace the glamour of jewelry-themed press-on nails and let your fingertips become the ultimate fashion accessory!
1. Match with Your Favorite Jewelry
When it comes to accessorizing, matching your press-on nails with your favorite jewelry pieces can take your look to the next level. By coordinating your nail designs with complementary jewelry, you can create a cohesive and stylish appearance that will make heads turn. Whether you prefer delicate and dainty accessories or bold statement pieces, there are endless possibilities for pairing your jewelry-themed press-on nails with the perfect bling.
To start off, consider matching the color of your press-on nails with the gemstones in your jewelry collection. For example, if you have a stunning pair of sapphire earrings, opt for press-on nails in a deep blue shade to complement the rich hues of the gemstones. This coordination will tie your entire look together effortlessly.
In addition to color coordination, you can also match the patterns and designs on your press-on nails with the motifs in your jewelry. For instance, if you have a necklace adorned with intricate floral details, choose press-on nails that feature similar floral patterns. This harmonious pairing will create a cohesive and visually appealing aesthetic.
If you're someone who loves mixing metals in their jewelry collection, don't be afraid to do the same with your press-on nails. Experiment with combining gold, silver, rose gold, or even copper-toned accessories with corresponding metallic accents on your nails. This mix-and-match approach adds an edgy yet sophisticated touch to any outfit.
For those who prefer a more minimalist style, opt for press-on nails that feature simple and understated designs. Pair them with delicate jewelry pieces such as thin stacking rings or tiny stud earrings for an elegant and refined look. The key is to let one element shine while keeping the other elements subtle.
On the other hand, if you're feeling bold and want to make a statement, go all out by choosing press-on nails that are embellished with rhinestones or pearls. Pair them with chunky statement necklaces or oversized cocktail rings for a glamorous and eye-catching ensemble. This combination will ensure that all eyes are on your hands and accessories.
2. Create a Statement Look
To truly make a statement with your nails, it's time to think outside the box and get creative with jewelry-themed press-on nails. These unique designs are perfect for those who want to stand out from the crowd and showcase their rockstar style. Whether you're attending a special event or just want to add some glamour to your everyday look, here are some tips on how to create a cohesive and eye-catching statement look with jewelry-themed press-on nails.
Firstly, don't be afraid to experiment with bold and eye-catching designs. Jewelry-themed press-on nails come in a wide variety of styles, from delicate rhinestone patterns to edgy metallic accents. Take advantage of these unique designs and choose something that reflects your personal style and personality. If you're feeling daring, go for a design that features multiple colors or shapes for an even more striking look.
When creating a statement look with jewelry-themed press-on nails, it's important to consider the overall aesthetic you want to achieve. Think about the other elements of your outfit and accessories and try to create a cohesive look. For example, if you're wearing a sparkly cocktail dress, opt for press-on nails that feature similar sparkly details or metallic accents. This will help tie your whole look together and make a strong fashion statement.
Another way to create a statement look is by using jewelry-themed press-on nails as an accent nail. Choose one or two fingers on each hand to apply the press-on nails, while keeping the rest of your nails simple with a neutral color or basic design. This will draw attention to the jewelry-themed nails and really make them pop.
Additionally, don't forget about the power of coordinating your nail art with your favorite pieces of jewelry. If you have a signature necklace or bracelet that you love to wear, consider choosing press-on nails that complement its color or design. This will create a cohesive and stylish look that showcases both your nail art and your favorite accessories.
Tips for Choosing the Right Size and Shape
When it comes to choosing the right size and shape for your jewelry-themed press-on nails, there are a few important factors to consider. By taking the time to properly measure your nail size and consider your nail shape, you can ensure a perfect fit and a stunning manicure.
1. Measure Your Nail Size
Before applying your press-on nails, it's crucial to measure your natural nails accurately. Start by cleaning your nails and removing any old polish or residue. Then, use a flexible measuring tape or a ruler to measure the width of each of your nails from side to side. Make note of these measurements as they will help you select the correct size of press-on nails.
2. Consider Your Nail Shape
Just like natural nails, press-on nails come in various shapes such as square, oval, round, stiletto, and coffin. Consider the shape that best suits your personal style and preferences. If you have naturally round or square-shaped nails, opt for press-on nails with a similar shape for a more seamless look. On the other hand, if you want to experiment with different shapes or create a bold statement look, feel free to try out unique shapes that complement your overall style.
By taking accurate measurements and considering your desired nail shape, you can ensure that your jewelry-themed press-on nails fit perfectly and enhance your overall look. Remember that choosing the right size and shape is essential for achieving salon-quality results at home. So take your time during this step to guarantee an impeccable manicure experience!
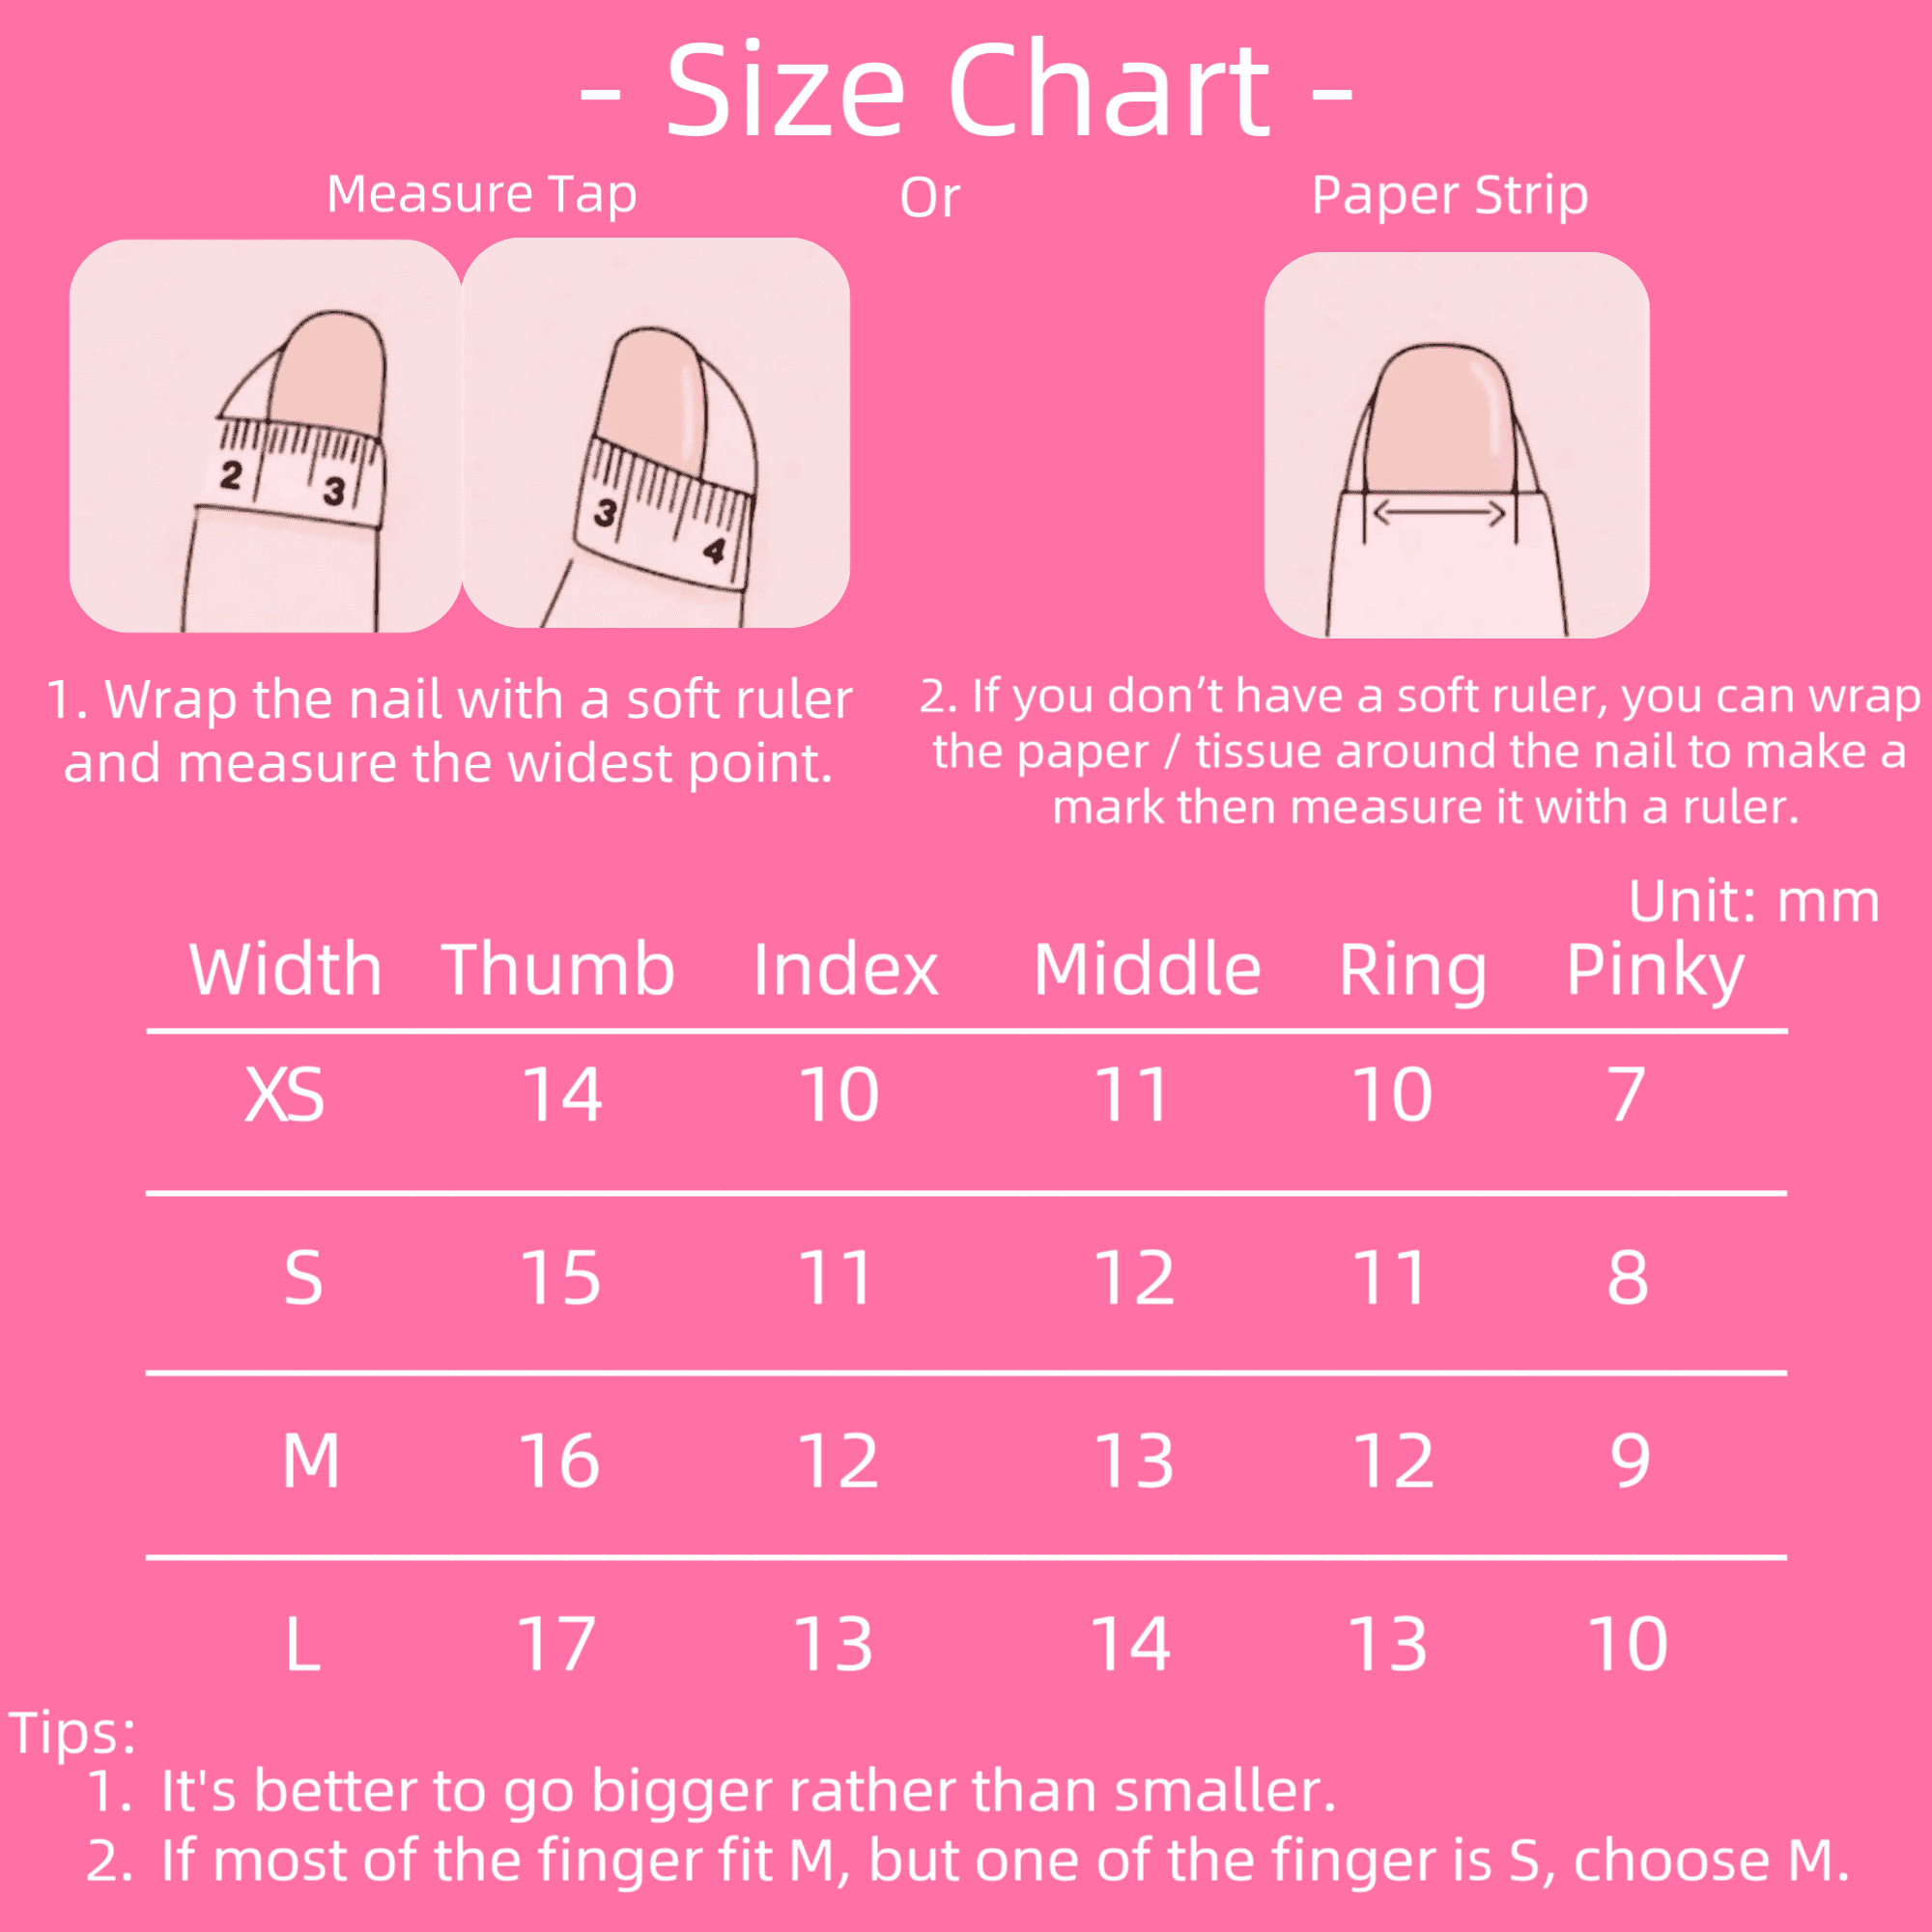
1. Measure Your Nail Size
One of the most important steps in applying press-on nails is to measure your nail size accurately. This ensures that the press-on nails you choose will fit perfectly and look natural on your fingers. Here is a step-by-step guide on how to measure your nail size:
-
Start by cleaning your nails: Before measuring, make sure your nails are clean and free from any polish or residue. This will give you an accurate measurement and prevent any interference.
-
Gather the necessary tools: To measure your nail size, you will need a flexible measuring tape or a ruler with millimeter measurements. It's important to use millimeters for precise sizing.
-
Measure the width: Take the measuring tape or ruler and place it horizontally across the widest part of your natural nail bed. This is usually around the center of your nail. Make sure to measure from one side to the other, without including the edges of your finger.
-
Note down the measurement: Once you have obtained the width measurement, write it down or take a picture for reference. This will help you select press-on nails that closely match your natural nail width.
-
Measure the length: Next, measure the length of your natural nails by placing the measuring tape or ruler vertically from the cuticle (where your nail meets your skin) to the tip of your nail. Again, record this measurement accurately.
-
Consider shape and size variations: Keep in mind that everyone's nails are unique in shape and size, so it's essential to consider these variations when selecting press-on nails. Some people may have wider or narrower nail beds, while others may have longer or shorter nails.
-
Use sizing charts: Many press-on nail brands provide sizing charts that correlate specific measurements with corresponding sizes of press-on nails. Refer to these charts to find the best match for your measured width and length.
By following these steps and accurately measuring your nail size, you can ensure a seamless and comfortable fit when applying jewelry-themed press-on nails. Remember to take your time and be precise in your measurements for the best results. With the right size, you can confidently rock these glamorous nails and showcase your unique style.
2. Consider Your Nail Shape
When it comes to choosing the perfect press-on nails, considering your nail shape is crucial. The shape of your natural nails will determine how well the press-on nails will fit and look on your hands. Different nail shapes can enhance or detract from the overall appearance of your jewelry-themed press-on nails. Here are some tips to help you choose the right nail shape for a flawless and stunning manicure.
Firstly, let's discuss the different nail shapes that are commonly available. There are several options to choose from, including square, round, oval, almond, coffin, and stiletto. Each shape has its own unique characteristics and suits different hand shapes and personal preferences.
If you have wider or shorter fingers, square-shaped nails may be a good option for you. This shape creates an illusion of elongated fingers and provides a more balanced look. Square-shaped press-on nails also offer a larger surface area for showcasing intricate jewelry-themed designs.
Round-shaped nails are a classic choice that suits most hand shapes. They give a softer and more natural appearance to your hands. Round-shaped press-on nails are versatile and can be paired with various jewelry-themed designs without overpowering them.
Oval-shaped nails are similar to round-shaped ones but have slightly tapered edges. This shape offers an elegant and feminine look while still maintaining a natural appearance. Oval-shaped press-on nails work well with delicate jewelry-themed designs that complement their graceful curves.
For those who prefer a more dramatic and edgy look, almond-shaped or stiletto-shaped press-on nails may be ideal. Almond-shaped nails have rounded sides that taper into a point at the tip, while stiletto-shaped nails have sharp pointed tips resembling claws. Both shapes create an illusion of longer fingers and add a touch of glamour to your overall style.
When choosing the right nail shape for your jewelry-themed press-on nails, consider not only your personal preferences but also your lifestyle. If you have an active lifestyle or work in an environment that requires frequent use of your hands, you may want to opt for shorter and more practical shapes like square or round. On the other hand, if you're attending a special event or want to make a bold fashion statement, longer and more dramatic shapes like almond or stiletto can be a great choice.
Step-by-Step Guide for Applying Press-On Nails
Applying press-on nails is a fun and convenient way to achieve salon-quality manicures at home. With the right tools and techniques, you can have gorgeous nails in no time. Follow this step-by-step guide to ensure a flawless application every time.
-
Prepare Your Nails: Start by cleaning your natural nails to remove any oils or residue. Use a nail file to shape and buff your nails, creating a smooth surface for the press-on nails to adhere to. Push back your cuticles gently with a cuticle pusher or an orange stick.
-
Apply the Press-On Nails: Select the correct size for each of your nails. It's important to choose a size that fits snugly without overlapping onto the surrounding skin. Peel off the adhesive backing from each press-on nail and align it with your natural nail, starting from the cuticle area and pressing down firmly towards the tip. Hold it in place for a few seconds to ensure proper adhesion.
-
Finishing Touches: Once all of the press-on nails are applied, it's time to make them look seamless and natural. Use a nail file or buffer to gently file down any rough edges or excess length. This will help blend the press-on nails with your natural ones for a more polished finish.
-
Optional: If desired, you can further enhance your manicure by applying a top coat of clear polish over the press-on nails. This will add shine and longevity to your manicure.
By following these simple steps, you can easily apply jewelry-themed press-on nails and enjoy beautiful, salon-worthy results from the comfort of your own home. Experiment with different designs and styles to showcase your unique personality and rockstar style! Remember to take care of your press-on nails by avoiding excessive water exposure or harsh chemicals that may cause them to lift or chip prematurely. With proper maintenance, you can enjoy stunning manicures that last for days!
1. Prepare Your Nails
Before applying your jewelry-themed press-on nails, it's important to properly prepare your natural nails. This will ensure that the press-on nails adhere properly and last longer. Follow these steps to get your nails ready for a flawless application.
First, start by removing any existing nail polish using a gentle nail polish remover. Make sure to thoroughly clean your nails to remove any dirt or oils that may be present. This will create a clean surface for the press-on nails to adhere to.
Next, trim and shape your natural nails using a nail file. If your nails are too long, it's best to trim them down before filing. Use gentle strokes in one direction to shape and smooth the edges of your nails. This will help prevent any snags or roughness that could cause the press-on nails to lift or break.
After shaping, gently buff the surface of your natural nails with a buffer block or a soft nail file. This step helps remove any ridges or imperfections on the surface of your nails, creating a smooth canvas for the press-on nails.
Once you've buffed your natural nails, it's time to push back your cuticles using a cuticle pusher or an orangewood stick. Gently push back the cuticles without applying too much pressure, as this can cause damage to the delicate skin around your nails.
To complete the preparation process, wash your hands with warm water and mild soap. This will remove any dust or debris left behind from filing and buffing your natural nails.
Now that you've prepared your natural nails, you're ready to apply the jewelry-themed press-on nails! With these simple steps, you can achieve salon-quality results without leaving the comfort of your home. So get ready to show off those glamorous and stylish jewelry-themed press-on nails!
2. Apply the Press-On Nails
To achieve a flawless and long-lasting manicure with your jewelry-themed press-on nails, it is crucial to follow the correct application process. Here is a step-by-step guide to help you apply your press-on nails like a professional:
-
Prepare Your Nails: Before applying the press-on nails, it's essential to prepare your natural nails properly. Start by removing any old nail polish and gently file your nails into the desired shape. Push back your cuticles using a cuticle pusher or an orangewood stick. This will create a clean canvas for the press-on nails and ensure better adhesion.
-
Apply the Press-On Nails: Now comes the exciting part – applying the jewelry-themed press-on nails! Begin by selecting the appropriate size for each of your natural nails. It's crucial to choose a size that fits snugly without overlapping onto your skin or cuticles.
Peel off the adhesive backing from one press-on nail and carefully align it with your natural nail near the cuticle area. Slowly press down on the nail, starting from the center and working towards the sides, to eliminate any air bubbles or gaps.
Repeat this process for all of your remaining nails, ensuring that each one is applied securely and evenly. Take your time during this step to ensure proper alignment and placement of each press-on nail.
-
Finishing Touches: Once all of your jewelry-themed press-on nails are in place, it's time for some finishing touches to complete your salon-worthy manicure.
Use a nail file or buffer to gently smooth out any rough edges or unevenness around the tips of your newly applied press-on nails. This will give them a seamless appearance and make them look even more natural.
If desired, you can also apply a top coat over your press-on nails to add extra shine and protection. This will help extend their lifespan and prevent chipping or peeling.
Remember to be gentle with your hands and avoid activities that may put excessive strain on your nails, such as typing or opening cans, for the first few hours after application. This will allow the adhesive to fully bond with your natural nails and ensure a longer-lasting manicure.
By following these simple steps, you can achieve a flawless and professional-looking manicure with your jewelry-themed press-on nails. Experiment with different designs and styles to showcase your unique personality and rockstar style. Get ready to turn heads and receive compliments on your fabulous nails wherever you go!
3. Finishing Touches
To achieve a natural and polished look with your jewelry-themed press-on nails, it's important to pay attention to the finishing touches. These final steps will ensure that your manicure lasts longer and looks flawless. Here are some tips on how to file and shape the press-on nails for a natural look, as well as the importance of applying a top coat for added durability.
Firstly, filing and shaping the press-on nails is crucial to create a seamless blend between your natural nails and the artificial ones. Start by using a nail file to gently shape the edges of the press-on nails. It's best to file in one direction rather than back and forth, as this helps prevent any damage or splitting. Take your time and be careful not to file too much, as you want to maintain the desired length and shape.
Next, consider using a buffer to smooth out any rough edges or imperfections on the surface of the press-on nails. This will give them a more natural appearance and make them feel smoother against your fingertips. Gently buff each nail in circular motions until you achieve a desired level of smoothness.
Once you have filed and buffed the press-on nails, it's time to apply a top coat. This step is essential for enhancing their longevity and preventing chipping or peeling. A good quality top coat will also add shine to your manicure, giving it a professional salon finish.
When applying the top coat, make sure to cover both the press-on nails and your natural nails underneath. This will provide an extra layer of protection against daily wear and tear. Allow the top coat to dry completely before moving on with your day.
In summary, taking care of the finishing touches when applying jewelry-themed press-on nails is key to achieving a natural look that lasts longer. By filing and shaping them correctly, you can seamlessly blend them with your natural nails. Applying a top coat adds durability and shine, ensuring that your manicure stays flawless for days to come. So go ahead and press on those jewelry-themed nails with confidence, knowing that you have the knowledge to make them look their best!
Conclusion
After reading this blog post, you are now equipped with all the knowledge and inspiration you need to enhance your nails with jewelry-themed press-on nails. These unique designs will undoubtedly make you the talk of the town and showcase your rockstar style. By following the step-by-step guide for applying press-on nails, you can easily achieve a salon-quality manicure experience without leaving the comfort of your own home.
One of the most exciting aspects of jewelry-themed press-on nails is the opportunity to get creative with accessorizing. You can match them with your favorite jewelry pieces to create a cohesive and stylish look. Imagine pairing your diamond-shaped press-on nails with a delicate diamond necklace or matching your gold-themed press-ons with statement earrings. The possibilities are endless, and this is where you can truly let your personal style shine.
In addition to matching with your favorite jewelry, these press-on nails also allow you to create a statement look all on their own. With intricate designs inspired by various types of jewelry, such as diamonds, pearls, or gemstones, you can instantly elevate any outfit and make a bold fashion statement. Whether you're attending a special event or simply want to add some glamour to your everyday life, these jewelry-themed press-on nails are sure to turn heads and make you feel like a true fashionista.
Before diving into the world of jewelry-themed press-on nails, it's important to choose the right size and shape for your natural nails. This will ensure that they fit properly and look natural once applied. Take the time to measure your nail size accurately using a measuring tape or ruler. Consider your nail shape as well – whether it's square, round, oval, or another shape – so that you can select press-ons that complement your natural nails perfectly.
Now that you have chosen the perfect set of jewelry-themed press-on nails and determined their size and shape, it's time to apply them following our easy step-by-step guide. Start by preparing your nails, ensuring they are clean and free of any polish or oils. Then, carefully apply the press-on nails, making sure to align them with your natural nail bed. Finally, add any finishing touches such as filing the edges or applying a top coat for extra durability.
In conclusion, jewelry-themed press-on nails offer a convenient and stylish way to enhance your nails without the need for salon visits. With their unique designs inspired by various types of jewelry, you can effortlessly showcase your rockstar style and make a fashion statement. By following the tips for choosing the right size and shape and using our step-by-step guide for application, you can achieve salon-quality results from the comfort of your own home. So why wait? Try out different designs and styles, experiment with creative ways to accessorize, and let your inner nail artist shine! We would love to hear about your experiences and see your stunning nail art creations – feel free to share them with us!